How to create a custom imagemap for your REDCap project
A simple step by step guide.

REDCap is a web-based application developed by Vanderbilt University to capture data for clinical research. It offers customizable data collection tools with a user-friendly data entry interface which makes it especially useful for clinical trials. Advanced users/administrators can improve their data collection capabilities by implementing external modules from the REDCap repository.
Image mapping is a feature available in the repository that makes it possible to use clickable images in place of multiple select options like radio buttons and checkboxes. Adding an image map to your REDCap project can make your data forms/surveys more intuitive and decrease potential clutter or confusion. Below are Github links for currently available image map modules.
- Custom image maps with radiobuttons: https://github.com/redcapuzgent/redcap_imagemap_radio
- Custom image maps: https://github.com/redcapuzgent/redcap_customimagemap
- Image map (PAINMAP): https://github.com/ctsit/imagemap
- SVG image maps: https://github.com/ui-icts/redcap-svg-imagemap
Contact your REDCap administrator to add external modules.
Create a custom image map
- Use a custom image mapping tool such as image-map.net or image-maps.com.
- Find an image. This is the one we will use for the tutorial:

3. Begin mapping clickable areas.

4. Delete the map url (this will prevent redirecting users when clicked), add title, and alt.

5. Continue until all clickable areas are mapped.
6. Get HTML code.


7. We now have an image map!
Add image map to REDCap
- Create a checkbox field.
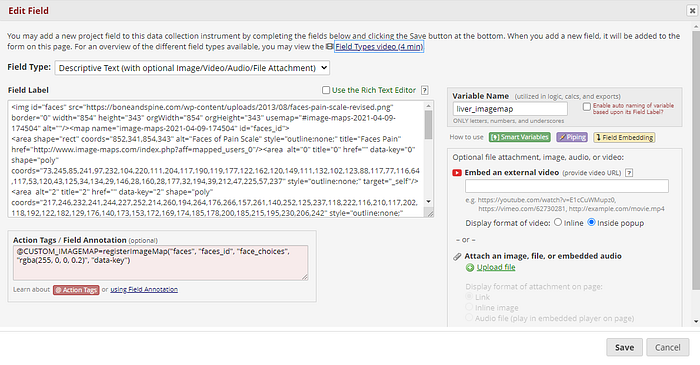
- Create a descriptive text field.
- Add your HTML code to the field label. Take out line breaks (these will ruin your syntax).
- Add @CUSTOM_IMAGEMAP action tag. Use the following parameters:
- imageId: The id of the image as defined in the <img id=…> tag.
- mapId: The id of the map as defined in the <map id=…> tag.
- originalCheckboxesName: The name of the checkbox variable as defined in REDCap.
- color: The HTML color that is used to highlight sections using the rgba() function. You can select an RGB color by using the colorpicker.
- codeAttribute: The attribute that can be used in the map to identify the code. This is used to couple imagemap areas in the code to the checkboxes in REDCap. If you have an area and define it as <area data-key=”2" …> then the external module will look for a checkbox that has “2, …” option.
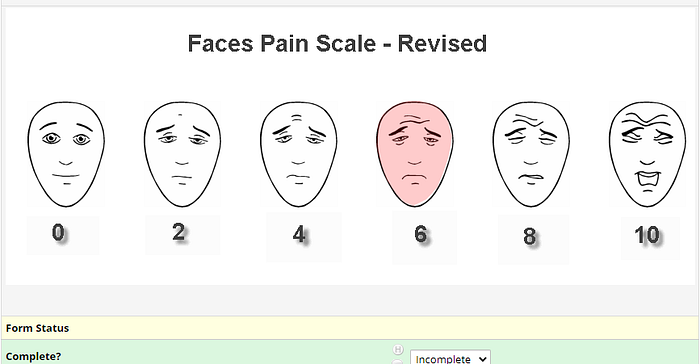
5. We now have a custom image map in our REDCap! Check out the browser console if there are any issues.
All code and files used in this tutorial are available in this repository. Enjoy your new REDCap skills!